Thursday, April 7, 2011

Just playing around with an Easter Tag

I was just playing around with the Tim Holtz Multi Medium and Distress Inks technique where you stamp an image on a background using Multi Medium and when dry, cover the entire area with distress ink to reveal a see-through type image.

I was thinking about entering the Studio L3 Grungy Monday challenge #2 when I created this tag, but I wasn't happy with the technique so just decided to finish it up and put it aside for later use.

My entry into the SL3 GM2 challenge will be up next.

Tuesday, April 5, 2011

Photo Box or Frame - You Choose!

Well! It pays to read doesn't it! I was creating an altered object for the Our Vintage Affair (OVA) challenge and it seems I got carried away with the project, because I didn't use the "Easter Decoration" theme. Oh well, you live and learn, don't you!

Well, here it is anyway. I made it using the following:

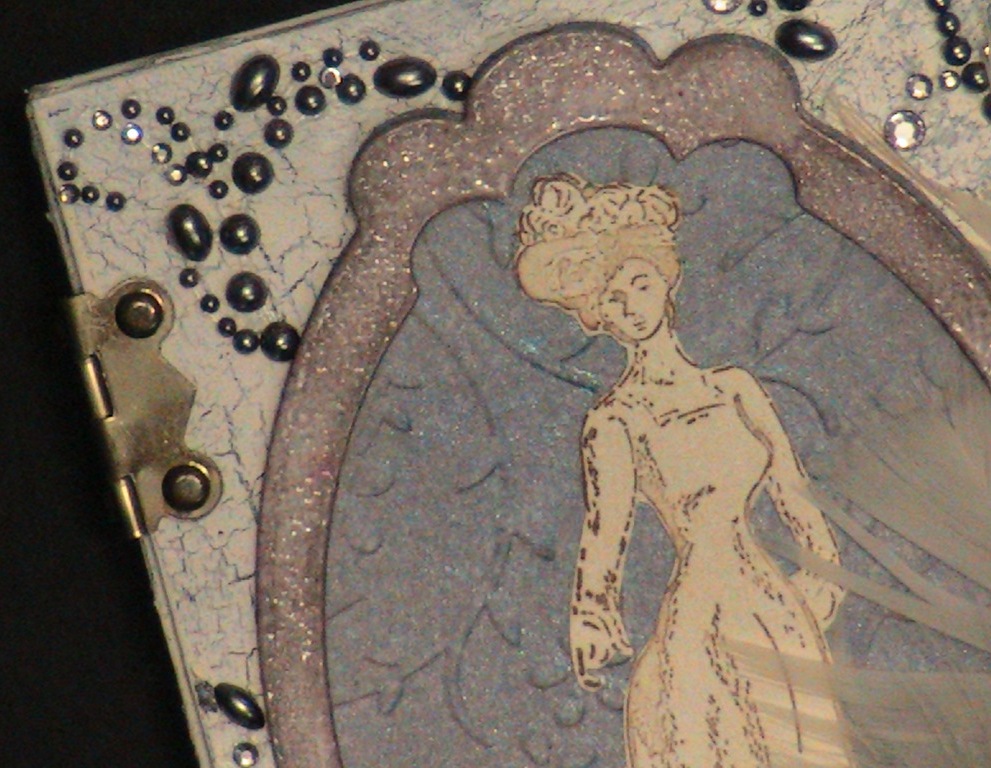
* medium weight chipboard * acrylic paints * Crackling Medium * hot glue * metal hinges * Tim Holtz Hitch Fastener * Deja Views "Wedding" paper * Spellbinders Nestabilities "Labels Ten" dies * See Dee's vintage lady stamp * Prima Say it in Pearls * 25mm Foam Rose Head Blossoms by Vivaldi * Flower Fantasy embossing folder * various Tim Holtz distress inks * various Tattered Angels Glimmer Mists * some tiny flowers & a couple of feathers


The size of the box/frame is 4" x 6" with 1/2" strips for the height. The individual elements details are as follows:


The chipboard pieces cut - 2 @ 4" x 6", 4 @ 3" x 1/2", 4 @ 6" x 1/2". The chipboard base coat was painted with a mixture of burnt umber and black, dried, then a layer of Derivan water-based Crackling Medium and dried, then painted with a mixture of titanium white and bisque (cream).


I adhered the designer paper before attaching the hinges which resulted in trying to find a way to hide the brads, I decided to re-cover it with a new piece of the designer paper, distressed using the TH distressing tool then inked using TH Weathered Wood distress ink. I did this because I wanted to leave the inside cover free for a photo.


I used Weathered Wood and Pumice Stone distress inks for the labels die on the front of the box.


I adhered a piece of 4" x 6" foam on the bottom of the box frame but I didn't show this in the video.


I have uploaded an in-the-making video of this to show how and what I did to make this project. It was a long day making this one, I even cut my finger trying to cut the chipboard to 1/2" pieces (you'll see the bandaid in the video). Oh well, all in the name of scrapbooking :)


Click here to see the video.


Wednesday, March 30, 2011

Clover Flower Frill

Here's another fabric flower that I'm loving at the moment. I recently bought a couple of Clover flower templates and tried one of them out tonight (the easier of the two) and these are the results. I'm thinking the yellow flower (I know, it looks like a peach colour, but trust me - it's yellow) looks like a carnation!


I've uploaded a couple of videos showing how I make these flowers, together with a tutorial on how to resize the flowers by making a new template from the Mothers Day Bouquet Cricut cartridge.


Click here to check out the first of two videos - sorry, just couldn't fit it all into one video LOL.

Technostamper Sketch Challenge #167

Well, it seems since I started using my blog the way it was meant to be I have been obsessed with updating it with challenges LOL. Well, that's a little white lie - Michelle (bohemiangypsy99 on YouTube) has really got me hooked on sketch challenges. We were skyping this afternoon while I was attempting to create this TechnoStamper challenge before we were so rudely interrupted by a storm!!!!

Anyway, I eventually finished the card sketch and so here it is!


The card base is a standard 4 1/4 x 5 1/2 size and I used a pretty pale lilac shade here. 1/4 inch down in size for the mat I used a deep purple shade of cardstock. The same two colours are used for the scalloped circles as well as a circle in a cream colour cardstock, on which I stamped using a fairy sitting on the moon stamp from the "Fairyland" clear stamp set from Crafty Secrets. I coloured the image using my Copic Sketch Markers (not real clever at using these just yet - I will learn no doubt). I also heat embossed the moon and stars of the stamped image using "Queen's Gold" emossing powder by Ranger. I also stamped the word "Dream" from the same stamp set by Crafty Secrets on the deep purple mat. The rectangle piece is a gold coloured cardstock which I dry embossed using the "Swiss Dots" embossing folder by Provo Craft (Cuttlebug). And finally, tied it all together with a sheer cream coloured ribbon & bow.


Tuesday, March 29, 2011

Studio L3 - Grungy Monday Number One - Tag

Studio L3 has started their new Tim Holtz Grungy Monday challenges and I'm IN!!!!! I love anything from the Timster!!! The challenge for this week was to create something using the Tim Holtz 12 Tags of Christmas 2008 - No.10 as a guide.

Although I seem to have created it as close to Tim's as I could, I think - oh well, maybe I'll grow with the challenge hehehe. We'll see!

I didn't have all the products used by Tim Holtz (most of them though). I've uploaded photos of each section that I worked on and products I used so that I didn't have to type up the entire list of contents because I used A LOT!!!

I really enjoyed this challenge and will be participating each week - can't wait for next Monday!!!


To view the videos I made on creating this tag click here.


My take on Grungy Monday Number One


Friday, March 18, 2011

Tag Time #6 - Vintage Grunge Tag

I made a tag in a vintage/grunge style using lots of distress inks, alcohol inks, lots of stamps, lace, charms and a fabric flower.

I first distressed the #8 shipping tag using distress inks, then stamped using a clear script stamp (sorry, don't know where this one came from - I've had it for ages and do not have the packaging).

I then stamped various gears, cogs, vintage lady, fob watch, leaves and heat embossed a butterfly.

I then adhered a rose charm using a small section of chain which I adhered to the tag using Glossy Accents.

I took a silver metal flower and alcohol inked it using aqua, stream and black inks, placing a clear rhinestone in the centre and covering it with black alcohol ink and then topped it with a clear rhinestone. I then adhered it to the tag using glossy accents (I had to adhere it with hot glue as I was too impatient for the glossy accents to dry).

I cut the word "friends" using the Doodletype Cricut cartridge, cutting the word four times and stacked each of the four letters on top of each other creating a faux chipboard letter. I did this to all the letters of the word "friend".

I took a postcard piece of Graphic 45 "On the boardwalk" paper, grunged it using vintage photo distress ink, then distressed the edges using a distressing tool and inked it over with walnut distress ink. I rolled one corner section, then adhered the word "friends" to the postcard and adhered it to the tag.
I adhered the word "friends" to the postcard and attached it all to the tag.

I adhered a black feather to the tag, then adhered a fabric flower over the bottom of the feather.
I also placed some black Rhinestone flourishes (Passionate from Francheville) randomly over the tag below and above the postcard.

Once all items were attached I then cut a piece of cardboard to size, covered it using Stampin' Up!'s "Newsprint" designer paper, grunged it up using vintage photo distress ink and walnut stain distress ink. Adhered it to the back of the tag using my ATG.

Attached an eyelet, threaded through some fibres and a string of leather. Then took a Tim Holtz trinket pin and attached a bead charm made specifically for the tag.
This tag took me a few hours one day, then a few more hours the next day to complete. There were a lot of fiddly time consuming tasks involved with this tag - but I loved making it!!!
I have uploaded a video - well, there are two parts to the video - you wouldn't expect any less would you? It is me - the queen of the mini series LOL.

Let me know what you think.


Thursday, March 10, 2011

Precious Moments Paper Bag Mini Album

This is my latest mini album complete with photos & embellishments. This is the first of many minis for my granddaughter, Amelia. I'm hoping to document (written & graphic) certain moments in her life and give the albums to her when she's older.

This, the first of the minis, is of her birth, christening and various events throughout her young life.


The following is a list of the main products and various measurements used throughout the mini:

Paper used - Cosmo Cricket's Joy Ride mini deck

Paper bags - 3 1/4" by 5 1/4"

Binding hinges - 3 1/2" x 3 1/4" scored at 1", 1 3/4", 2 1/2"

Front & back cover chipboard cut at 6 1/2" x 3 3/4"

Front & back designer paper each cut at 9" x 4 3/4" scored 1/2" on two long and one short edge
The wallet tag pockets were made using the dimensions given by Kathy Orta in the video series on her Tim Holtz paper bag mini album. Click here for Kathy's tutorial.

The binding system I used is a variation on Laura Denison's technique. Check out the tutorial by clicking here.

The fabric loop flower was made following Jules' tutorial. Check out the tutorial here.