Sunday, December 1, 2013
Sunday, November 17, 2013
Announcement - 2013 New Year's Eve Worldwide Streamathon
Announcing the 2013 New Year's Eve Worldwide
Streamathon!!! Yes, that's right! Our inaugural streamathon last year
was a huge success so we're at it again! Hopefully we will have more
streamers, more viewers, and I'm sure as much fun as last year.
This year we have created a FaceBook page to add all the information about the Streamathon so you can check at a glance what's been added, changed, etc. Click here for the 2013 New Year's Eve Worldwide Streamathon FaceBook page.
Here is a sneak peek at what I'll be making in the Oz timeslot. I will have a supply list and instructions on my blog a week prior to New Year's Eve 2013 so anyone who wants to play along and create with us can.
There will be many streamers providing free classes, showing various techniques, all having a great time bringing in each country's 2014! So why not join us!
You can email me if you are interested in streaming or participating or even want to donate prizes - yes, we will be having plenty of giveaways throughout the day/night!
This year we have created a FaceBook page to add all the information about the Streamathon so you can check at a glance what's been added, changed, etc. Click here for the 2013 New Year's Eve Worldwide Streamathon FaceBook page.
Here is a sneak peek at what I'll be making in the Oz timeslot. I will have a supply list and instructions on my blog a week prior to New Year's Eve 2013 so anyone who wants to play along and create with us can.

There will be many streamers providing free classes, showing various techniques, all having a great time bringing in each country's 2014! So why not join us!
You can email me if you are interested in streaming or participating or even want to donate prizes - yes, we will be having plenty of giveaways throughout the day/night!
Friday, November 15, 2013
Ustream Schedule Change
Hi everyone!
I have had several ladies ask me if it was possible to stream later in the evening as some work during the day and others live internationally and are sleeping whilst I broadcast. So.....I have decided to alternate my weekly Ustream broadcasts.
Commencing this week (tonight) I will stream at 10pm Australian Eastern Daylight Savings Time (AEDT) for those of you who cannot make it to my morning streams. Next week I will broadcast from 11am AEDT.
So the project I will be making tonight was created by Kathy Orta (Paper Phenomenon) way back in December 2010 - Christmas Advent Calendar. I have made it bigger than the size originally taught by Kathy to accommodate "larger" goodies inside the boxes.

You can grab a copy of the supply list here.
You can click here to go to my Ustream channel.
Hope to see you all there!
Smiles
Jen
Friday, October 25, 2013
Question for you all - UPDATED
UPDATED
I have since heard from both the company and the consultant involved.
I have to say that the consultant did everything right, the company asked me if I wanted the workshop removed or if I wanted my name added to the marketing catalog (this was called the "Instructions Sheet" for consultants to download, however it was visible to all.
I advised the company that it looked like the consultant didn't do anything wrong and I am happy for her to host the workshop based on my ink storage unit (the consultant has made minor changes to it from my original design). My understanding is that there was miscommunication at work.
So all is okay with the world now :)
UPDATED
I have since dug deeper into my post on this storage unit and have realised that I okayed this lady to host a workshop on the storage unit. The lady also said that she would acknowledge my name as the designer, however I do not see anywhere on the company's catalogue that I am the designer, only that this lady "created" the unit. So I don't know what to think. Has this lady informed the company and they choose to ignore it? I have emailed the company and am awaiting a response. I will update this post if/when I receive a reply.
Question for you all - would love to know your thoughts on this please:
Remember how I DESIGNED & CREATED the Distress Ink Storage Unit back in September last year? Remember how I put it out there - instructions and all - for anyone who wanted to make it for themselves?
Was it remiss of me to not to add "please do not sell the design by way of a Scrapbooking Company class"???
Yes, I have just been informed by Kylie Powell (Shop and Crop Scrapbooking) that someone told her that they had seen this distress ink storage unit up for a class by a certain scrapbooking company and that this must have been where Jenny (me) came up with the idea) - WRONG!
The consultant for this scrapbooking company has mentioned that she got the design from my blog via Pinterest but on the scrapbooking company's web site Master Class Workshops - Beyond the Page Catalogue & that it was "created" by this consultant ? ?
Maybe she has changed the way in which she built it???
See for yourself and please let me know your thoughts on this.
Thanks
Jen

Sunday, October 13, 2013
Tag - playing around with paper & paint
I just wanted to play around last night so I decided to make a tag and slap some paint on it and see what happens. I quite like the effect!
I uploaded a video to YouTube of the process I went through from start to finish (timelapse) and you can watch the video here.
Here are a few close-up photos of the tag which wasn't really shown on the video.


I uploaded a video to YouTube of the process I went through from start to finish (timelapse) and you can watch the video here.
Here are a few close-up photos of the tag which wasn't really shown on the video.


Sunday, October 6, 2013
Hot Glue Gun Stand
Well, I must admit I cannot believe we haven't thought of making this one before! How many times have we cursed our glue guns when they wouldn't stand where we wanted them to? How many times has the hot glue dripped on our projects? I know I've cursed mine a thousand times or more!
Until now!!!
And it is soooooo easy to make! One of my online friends, Sandy, has made it already, after watching me show how to make it on Ustream (click here) and Sandy said the hardest thing about making it was cutting out all the chipboard pieces - yes - it's that easy!
I have written a short instruction on how I made it, but it's not a comprehensive tutorial, so if you get stuck, watch the ustream recording first, then put it together! Click here for the instruction sheet, or it's over to the right of this post under the Handy Links section.
I have made a YouTube tutorial on how I made the prototype, but I ramble on, chop and change my mind, so maybe the Ustream is a better option to watch LOL. Anyway click here for the YouTube video, if you dare!
Wonder what I NEED next?

Friday, September 27, 2013
Circular Drawers Storage Unit
Well, I've been at it again - made another storage unit. This time it's round in shape! I saw a tutorial on YouTube by Einat Kessler. Einat used the CD's and the chipboard for the dividers, but only used cardstock for the drawers. You can see Einat's tutorial video here. Einat mentioned in the video that she would upload a pdf file of the template to her blog when she returned from holidays, check her blog here.
Well, me being me, I couldn't wait for the template so I created my own, using the few measurements Einat mentioned in her video. I added chipboard to the drawers and magnets to the drawers, as well as creating my own system to create the drawers.
You can check out my YouTube video - the first part here.
I also recorded a Ustream session on making another layer and you can see the recording here.
If you would like to make the Circular Drawers Storage Unit I have put up a pdf of the instructions here on my blog under the Handy Links section, or you could just click here.
What's next?

Tuesday, September 24, 2013
4x4 Gift Card Box WITHOUT the WRMK Envelope Punch Board
Hi everyone!
For all those wanting to make the 4x4 gift card box but do NOT have the WRMK Envelope Punch Board - it IS possible to make it without one, along with other projects the WRMK Envelope Punch Board is being made famous for. Just a little tweaking is all that is needed.
I do have the WRMK Envelope Punch Board, and I made the gift card box using it but I found that it's not rocket science what they have done - just great marketing I guess. The Martha Stewart Scoreboard can make these and any other box you want to make - paper bags, envelopes (real A2 sized envelopes at that) and much more!
Anyway, I decided to make a gift card box using my Martha Stewart Scoreboard, and may I say, it was just as easy. I uploaded a video on YouTube (watch it here) on how I made the gift card box plus the dimensions and how-to on making the envelopes for 4x4 cards. I have also uploaded written instructions and you can find them to the right of this post under the Handy Hints section or just click here for the instructions.
Until next time - happy scrappin'!

Sunday, September 1, 2013
Project Life Storage Unit
Well, who knew about Project Life? Not me, that's for sure! That is until my daughter, Mandy showed me her recent purchases - all those core kits! Apparently this Project Life thing has been around for years and years! Where have I been? Well, probably slogging away building my boxes and storage units LOL. And now - well, here's another one LOL.
Mandy wanted to buy something that would hold her cards and we were out "shopping" when Mandy picked up something that she thought would do the job of holding her cards. Wait for it - yep, I opened my big mouth and said "I can make you one!"
So I did!
Here's the first one I made.


Then I thought "maybe others would like something like this to store their Project Life cards". So I decided to stream making another one - a matched set for Mandy - lucky gal! LOL
I wrote a tutorial on how I built the unit but it was lacking photos. So yep, I went and made another one. This time, instead of painting the edges, nooks and crannies, I inked them and grunged it up!

I took plenty of photos and jotted down the instructions as I went along. The final tutorial is here on my blog under the "Handy Hints" column up the top. I have put a price on the tutorial as I've had so many requests for a tutorial, and I've spent hours and hours typing it up and trying to ensure there are no mistakes, so I hope you understand the cost, albeit only $AU5. I have added drawers and two side units to the PLSU and have written instructions for both. If you buy the Project Life Storage Unit you get the drawers and side units instructions free!

You are more than welcome to go ahead and make one yourself by watching my Ustream recording on making the second unit here, although the measurements have been refined with the final unit. I've also uploaded a time-lapse video onto YouTube making this grunge unit and you can watch it here, the drawers here, and the side units here -
Next project - Stay tuned!
Friday, August 23, 2013
Michael's Paper Bag WITHOUT die or punch!
Hey there everyone! Been a while - oopsie!
Recently I saw a post on FaceBook which gave a link to a YouTuber, BochTV, who created a paper bag exactly like the Michael's brand. What was so mind boggling was that this lady didn't even use a scoreboard!!! Imagine!!!
Anyway, I thought hmmmmm, you know me and measurements, so I dismantled a Michael's paper bag, worked out the measurements and score lines and voila! I actually made one EXACTLY the same!!!!
I was so excited that I posted pics to my FaceBook and Twitter accounts and well, was so excited that when Sandy Jones (yes, the naughty Sandy) asked me to stream it, I did! Click HERE for the Ustream recording.
I then decided to put it out there on YouTube (click HERE) to share with everyone, particularly our Aussie and European crafters who do not have access to a Michael's store.
Instructions are here on my blog under my Handy Links section or you can click HERE for the pdf instructions file. It opens automatically and you can either print it or save it to your computer.
Enjoy!

Saturday, June 15, 2013
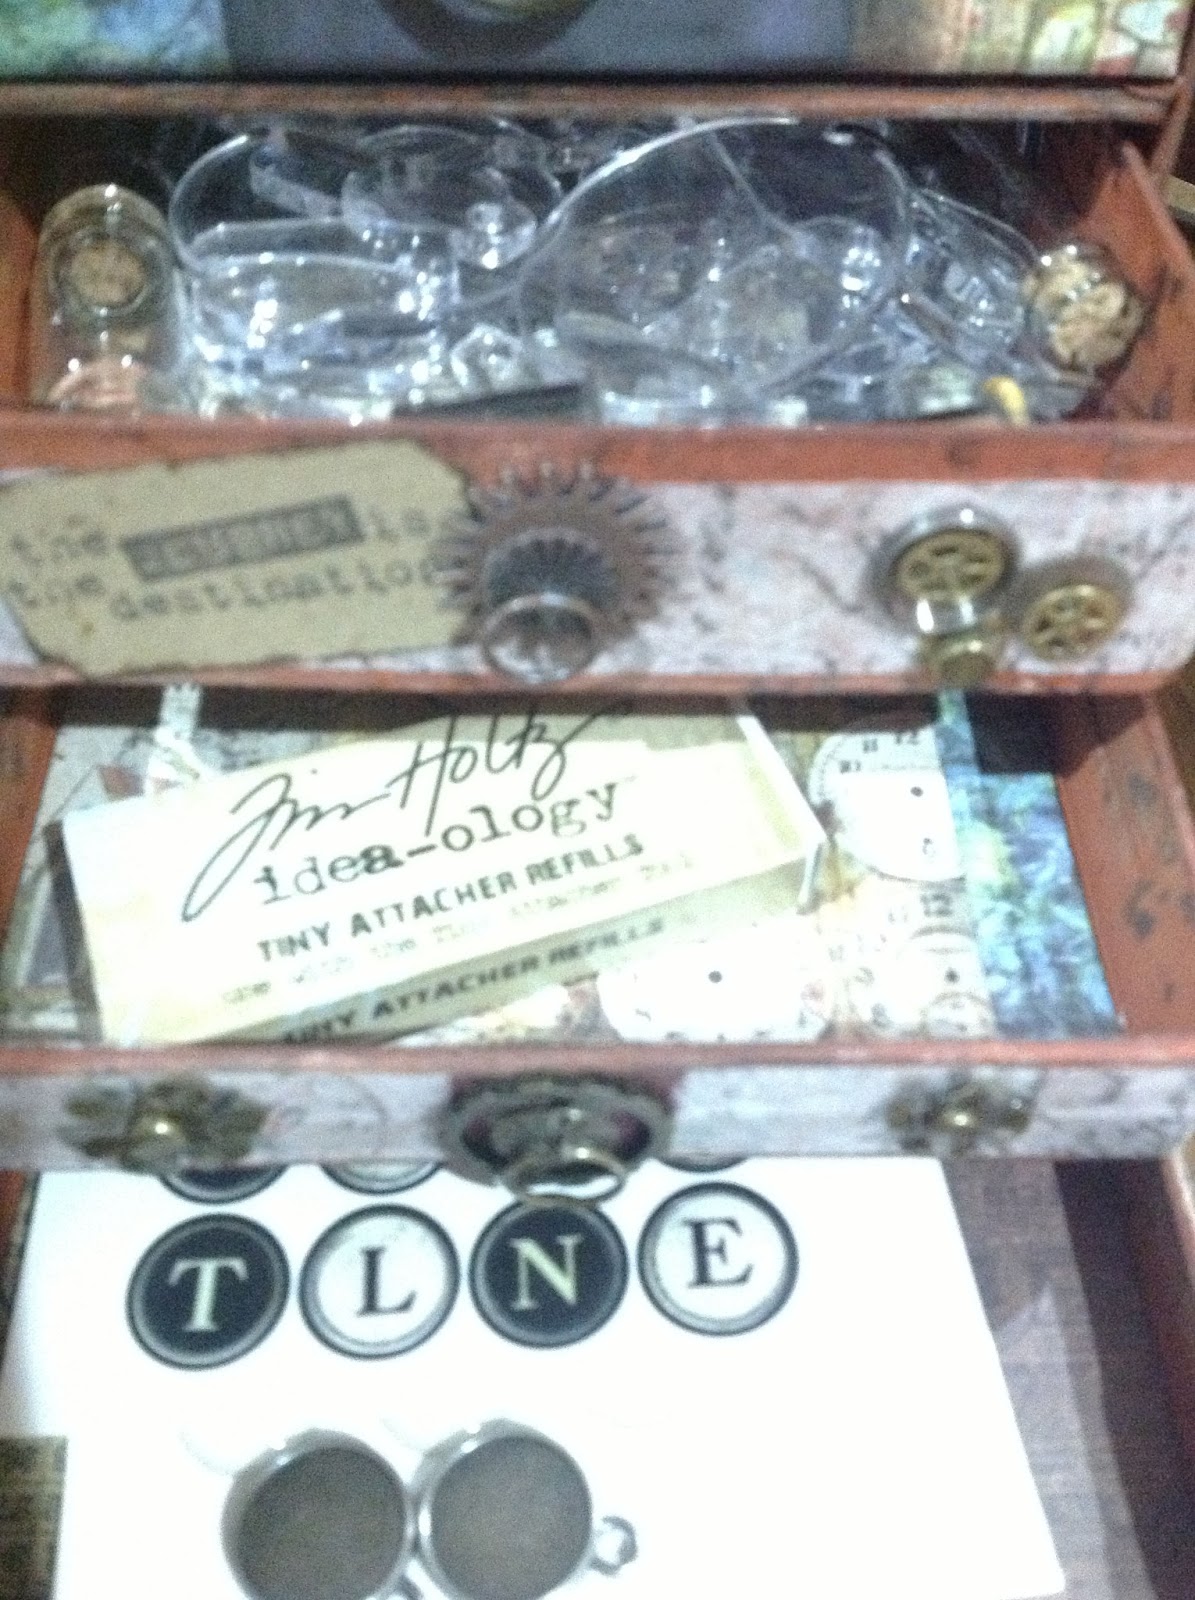
Tim Holtz Storage Unit (inspired by Harry Potter Wizard's Collection)
Hi everyone! It's been soooooo long since I've put a project up on my blog - so sorry! It's just that I haven't been doing much but doing DT card projects and simply just messing around in my craft room not accomplishing anything much.
That is until I was challenged by Felicia and Eileen to make the Harry Potter Wizard's Collection box! I procrastinated on that one - liked the concept, started making the drawers for the bottom, then how I was going to make the drawer surrounds, got confused and put it aside for a while. I've only just come back and forged ahead!
Below are some pics of the project during the stages of being built. I also have a series on YouTube on the making of the storage unit, enjoy! Oh, and if you want to sit through a series on the making of this project, here's the link.
 |
| The Original Harry Potter Wizard's Collection Box |


Wednesday, May 29, 2013
I remember the good ole days
Hi everyone!
This post is in response to Gina's (Scrappinology) YouTube video posted today. I had way too much to say about this in the comments section, so I thought the best way to say it was to create a blog post and link it from the comments section under Gina's video.
Firstly, thanks to Gina for making me go back and re-live the good old days :)
So here goes...
I just want to add my two cents worth here. Let's break it down people. Remember 'the good old days' when people actually shared their knowledge and their love of crafts - before all the 'show & tell' videos started appearing. We'd participate in swaps so that we could have a piece of someone's art to admire and examine the techniques used so we could attempt to create something so very different to our own style. This is how our styles grew.
Now getting back to the point in question -
giveaways, we are all individually responsible for clicking SUBSCRIBE buttons,
we are all INDIVIDUALLY responsible for sending RAKs, we are all INDIVIDUALLY
responsible for participating in challenges. It's our own decision. Some people just let 'popularity' go to their heads and they end up doing things they don't even understand to be 'wrong'. This online crafting community is a way to SHARE our love of crafting, heck I even craft in Google Hangouts (not so much lately) with others chatting away as if we're all on a crop together!
On a negative side, we've had a few instances where people have come on with sob stories and lied their way into receiving 'RAKs', at the moment we've got others talking about libel and copyright infringements!!! Get real people - it's not about who does what the best - it's about SHARING this love of our craft that keeps us here!
But YES YES YES Gina, I long for the good old days, but I'm glad most of us have grown during the years :)
Smiles
Jen
This post is in response to Gina's (Scrappinology) YouTube video posted today. I had way too much to say about this in the comments section, so I thought the best way to say it was to create a blog post and link it from the comments section under Gina's video.
Firstly, thanks to Gina for making me go back and re-live the good old days :)
So here goes...
I just want to add my two cents worth here. Let's break it down people. Remember 'the good old days' when people actually shared their knowledge and their love of crafts - before all the 'show & tell' videos started appearing. We'd participate in swaps so that we could have a piece of someone's art to admire and examine the techniques used so we could attempt to create something so very different to our own style. This is how our styles grew.
So how did these people get such a huge following? By
people subscribing! Doing giveaways on behalf of their SUPPLIERS. So as a human
being it is part of our nature to imitate others. So we then think that if we
get a lot of subscribers maybe we could be selected to be on a design team? So
we then do a giveaway to get MORE subscribers? Why not go and buy some things
to giveaway (I won't eat this week), then I'll get more subscribers, and so on
and so on.
I gave up on watching HAUL videos because I got so jealous of what a lot
of crafters were able to get their hands on so readily and cheaply.
Some haul videos are letting us know what company has a sale on, deals,
bargains, etc, but as I do not live anywhere near these stores I just
cannot bear to watch them LOL.
Don't get me wrong, there are a lot of deserving crafters
on design teams and businesses market their products any way they can to keep
their business running. I'm just saying that it's easy to get caught up in all
this.
I personally have almost 400 videos here on YouTube. The
only reason I started making YT videos was because I was a member of Marion
Smith's Girls Gone Scrappy group of which Kathryn (the scrapbeach) was a
member. Kathryn then started her Scrapbeach Ning site so that we could have a
place to chat (Gina, you also were here at the beginning), upload pictures of
our projects from swaps organised through the Ning site.
I gained enough courage to do non-talkie vids which
developed into 'talkie' vids LOL. I have always tried to SHARE ideas, I never
sell anything. I have done giveaways at certain 'milestones' and currently have
a giveaway vid on YT. I have always said that I would never stop showing 'how
to' videos, start to finish projects, etc. because when I first 'found' YouTube
and all the great crafting tutorials, it was those tutorial videos that helped
me create projects I never thought possible.
So to all the 'newbies' out there, there are still some
of us oldies left who actually want to SHARE their love of crafts to this amazing online
crafting community. Yes we 'copy' but I would like to think most of us
acknowledge the person from who we learned the project or technique.
On a negative side, we've had a few instances where people have come on with sob stories and lied their way into receiving 'RAKs', at the moment we've got others talking about libel and copyright infringements!!! Get real people - it's not about who does what the best - it's about SHARING this love of our craft that keeps us here!
But YES YES YES Gina, I long for the good old days, but I'm glad most of us have grown during the years :)
Smiles
Jen
Monday, March 4, 2013
ATC Storage Box
Well, Jim (the gentleman crafter) has enabled me again! Yes, that's right - to make another box LOL.
I don't know what it is about box making but it's an addiction that's taken hold. I try to make the boxes to actually use for some sort of storage in my craft room, and this one is no exception. Although the reason behind this one was to participate in Tim Holtz's Tattered Florals challenge - why did I not use the die? Because my dear daughter, Mandy had it!!!
I don't have many ATC's because I haven't been in many swaps, so the size of this ATC storage box is ideal for my ATC collection :P
I've uploaded 4 parts to YouTube on making the box and the tab dividers to separate each ATC swap I've been in.
Here are a few pics of the completed ATC Storage Box:


Friday, February 22, 2013
Card Series - Birthday Card #2
I recently watched Jann Gray's YouTube video on the White-On-White technique and wanted to have a go at it myself and this is what I came up with.
I used a 5 1/2 x 4 1/4" white card base, cut a piece of white cardstock to 4 1/8" x 5 3/8", ran it through the Flourished Frame Cuttlebug embossing folder.
I then stamped a newsprint on white cardstock, coloured the entire area with some distress stains and die cut the leaves & branches using Tim Holtz's Autumn Gatherings Alterations die.
The sentiment on the front was stamped with Versafine Onyx Black ink and die cut with a Spellbinders Labels Eight die.
The leaves and branches were adhered with Scotch Quick Dry Adhesive, the sentiment piece was adhered using pop dots.
The butterflies were punched from a piece of white cardstock which I ran through the Swiss Dots Cuttlebug embossing folder using the Martha Stewart butterfly punch & adhered using Scotch Quick Dry Adhesive.

The inside of the card was stamped with Versafine Onyx Black ink, then I adhered two leaves between the sentiments.

The envelope was made from an 81/2" x 8 1/2" piece of white paper, stamped & sprayed in shades of green & yellow.
Supply List
 |
| card front |
I then stamped a newsprint on white cardstock, coloured the entire area with some distress stains and die cut the leaves & branches using Tim Holtz's Autumn Gatherings Alterations die.
The sentiment on the front was stamped with Versafine Onyx Black ink and die cut with a Spellbinders Labels Eight die.
The leaves and branches were adhered with Scotch Quick Dry Adhesive, the sentiment piece was adhered using pop dots.
The butterflies were punched from a piece of white cardstock which I ran through the Swiss Dots Cuttlebug embossing folder using the Martha Stewart butterfly punch & adhered using Scotch Quick Dry Adhesive.

The inside of the card was stamped with Versafine Onyx Black ink, then I adhered two leaves between the sentiments.

The envelope was made from an 81/2" x 8 1/2" piece of white paper, stamped & sprayed in shades of green & yellow.
 |
| envelope |
Supply List
- White Cardstock
- Hero Arts Wish Big clear stamp set (front sentiment)
- Amy R Birthday Sentiments rubber cling mount (inside sentiments)
- Stampers Anonymous newsprint wood-mounted stamp (Item # U2-943)
- Tim Holtz Autumn Gatherings Alterations die
- Spellbinders Labels Eight die
- Cuttlebug embossing folder Flourished Frame
- Cuttlebug embossing folder Swiss Dots
- Martha Stewart scoreboard & envelope maker
- Martha Stewart butterfly punch
- Tim Holtz Falling Leaves stamp set
- Tim Holtz Distress Inks in forest moss, bundled sage, scattered straw & antiqued bronze
- Versafine Onyx Black ink
- Ranger Archival Jet Black ink
- Home made glimmer mist (green), scor-tape & ATG tape, Scotch Quick Dry adhesive
Subscribe to:
Posts (Atom)