Monday, November 28, 2011

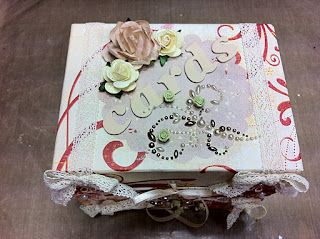
Card Box - Jean Style - #2

Another card box (again from Jean's tutorial) I made today from chipboard, K & Company's Wild Saffron paper, iamroses flowers, thickers alpha stickers which I painted using Tim Holtz's Sandal acrylic paint, Prima Say it in Pearls, Stampin' Up! lace, lace from A World of Lace, a lacy doily which I sprayed with Glimmer Mist, and lots of hot glue and Scotch Quick Dry Adhesive.

I painted all the edges & corners of the inside with a burgandy acrylic paint, then covered it all with more of K & Company's Wild Saffron paper. I inked up a piece of 5 7/8" x 2" tyvek with Ranger's Archival ink in Sepia and Maroon and adhered it to the top inside back of the box and the back inside of the lid using scor-tape.

I was going to attach some wooden feet to the box, but Mandy talked me out of it LOL.


Sunday, November 27, 2011

Christmas Advent Calendars

Advent calendars I made for my 3 youngest grandchildren. I wish I'd never started! One was enough!!!

Cayden's was made after I'd made the other two quite some time, so I forgot the measuremeants and this one ended up being about an inch bigger than Justin's at 16" x 16".


Mandy thought Amelia's was too small to fit anything of any value in so I adapted the sizing to accommodate her wishes (LOL) and made this one 15" x 15".


This was the first advent calendar I made using the original Kathy Orta dimensions 12x12.


Monday, November 21, 2011

Card Box - Jean-style

A card box made from a bit of Jean's tutorial, a bit of my flopportunities and a LOT of PATIENCE from Jean (MusicScrp) today LOL.
The box is made from chipboard, covered with K & Company's Wild Saffron paper, embellished with lace, seam binding, gold trim and a lot of glue LOL.
I've used an old button for the knob on the front for the closure in conjunction with the seam binding.
Inside the box I've used a piece of paper from Basic Grey's basics kraft paper stack to line it.
I've also used an entire Tyvek envelope to stabilise the structure inside the box.
I had so much fun making this - now it's time to fill it with cards - might have to wait a bit for that - still working on my Christmas cards LOL.


Front of box


Sunday, November 20, 2011

Christmas Cards - Ten out of Ten

I though it was time I made some Christmas cards this year. Past years I've just used store-bought cards. Had fun thinking of ways to make them just a bit different. Next year I'm thinking I'm gonna just make them all the SAME! LOL.


Friday, November 11, 2011

Xmas Lolly/Candy Wreath


Traditionally, I make a lolly wreath each Christmas, however I've been slack the last few years LOL. But I decided to go ahead and make one this year and this is the result!

Materials Used:
1 x wire coathanger shaped into a circle with hook
Green, Red, Silver & Gold curling ribbon
2 x large packets of wrapped toffees & eclairs
Piping for hook end
Ribbon for bow
Ribbon to wrap around top section where hook meets circle

I cut pieces of the curling ribbon into approximately 8" lengths. Then tied the curling ribbon to one end of the lolly wrapper and with the same piece of curling ribbon, tied the lolly onto the circle.

Do this for all lollies until the lollies reach about 2" from the beginning of the hook.

Wrap ribbon around where the end of the wire joins the hook to hide the uglies (optional as the lollies hide most of it anyway) and tape in place.

Take a piece of plastic tubing/piping and thread it onto the hook, covering as much of the hook base as possible.

Tie a bow using some pretty Christmas ribbon, and voila! Finished!

The beauty of this wreath is that you untie the free end of the lolly wrapper, take out the lolly, eat it and leave the wrapper still attached to the wreath!

Sunday, November 6, 2011

Large Wallet Pocket Album

This is what I've been drawn to make in the last couple of days since I watched Clare's YouTube video on her Holly Jolly Christmas Wallet Pocket Album. Just love it! I'm thinking it can be used for a single event album such as Easter, birthdays, anniversaries, Christmas, etc.


I used the Basic Grey cappella 6x6 paper pad AND YOU WILL USE IT ALL! This is a great way to use up your 6x6 packs!!!

The album measures 6 1/2 x 6 1/4 x 1/2 inch and has multiple fold-out sections.

The instructions stated to use a magnet for the closure, however mine didn't hold it together once I covered all the pages and added tags - then the pictures will have to be added, so I added a belly-band for the closure, embellished with a home-made paper flower inked up with LSG sprays and an epoxy brad.

There is little to no embellishments due to the size of the album when closed, apart from punched edges, stamping and bits and pieces of paper. Also used the Tim Holtz Alterations Movers & Shapers "Journey" die for the front of the album.

Loved this little album, Clare explains it very well - the "how to" is in 5 parts and there's another showing the tags she made.