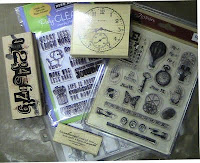
I started recording for a youtube video, but forgot to record while streaming, sorry. So here's a few pics of the page I was creating.
My Other Pages
Friday, April 29, 2011
Art Journal - Page 18
Thursday, April 28, 2011
USTREAM Sign
I'll be creating various projects on USTREAM and will start with a mini album using the 7gypsies "gypsy market" 6x6 paper variety pack.
I would really like to stream in the evenings for the Australian market as the time difference for live streaming of the internationals is, for us, either in the wee hours of the morning or during the weekdays when a lot of us are working. Either way, we should have all areas covered - I hope everyone will join me from all corners of the globe! I'm thinking either Monday or Wednesday evenings here at around 8pm DST. I would love everyone's thoughts and see what times suit all of you.
In the meantime I've created a sign to be used as my USTREAM "logo" and I've uploaded the 3-part series in the making of the sign, and here are some pics.
Tuesday, April 19, 2011
Craft Room Sign
Instead of itemising all the products used I've taken photos of them (I think I've shot all of them).
Check out the YouTube video here.
Here is the finished sign - 8 1/2" x 11":
and here's some close-up shots of the sign:


And here are the products I used to create the sign...
Wednesday, April 13, 2011
Tag Time #8 - Happy Easter


Friday, April 8, 2011
OVA April Altered Item Challenge - Easter Decoration
Well, it's my second attempt at this challenge - I forgot to include the most important element of the first attempt at this challenge - the Easter Decoration! LOL. Oh well, I've had fun playing :)
So for the April Altered Item Challenge - Easter Decoration over at Our Vintage Affair we had to alter an item and decorate it Easter style.
Here's my entry-
Products and materials used:
12 tongue depressors (that's what they look like LOL) in lightweight timber, cut to size, chomped ends with the Zutter corner rounder, painted base coat burnt umber, painted on a layer of Derivan Matisse Crackling Medium, then painted on a mixture of white & bisque (cream).
I then hot glued all pieces together, then took some twine and tied it around the long "timber" pieces.
For the sign I used lightweight chipboard and cut a "tongue depressor" to size using my Tonic scissors for the post. Again, painted both the sign and the post - the base coat in burnt umber, then dry brushed the white/cream mixture over the brown base coat (I didn't use the crackling medium on this). Then took a wood-mounted stamp by Fern Gully Stamp (made in Australia), inked it up with Versamark, stamped it onto the sign, then used black superfine detail embossing powder by Stamp-It and heat set the sentiment. I hot glued the signpost to the sign.Took some white "Shreds" by giftpackaging.com.au, glimmer misted it using Apple and Forest Moss.
I made a false bottom using white cardstock to give some height to the contents (I only had one pack of shreds), then added the easter eggs and finally set in the sign!
I went for the country-style look here with minimal "pretty" embellishments. Hope you like it and thanks for stopping by :)
A few close-up shots of the Easter crate


Thursday, April 7, 2011
SL3 Grungy Monday #2
I created a card with a background stamp of script and butterflies. I then stamped two butterflies and a dragonfly similar to the background stamp using Matt Medium. I stamped them at least half way off the original stamp so that it looks like the butterflies and dragonfly are flying off the page - well, that was the effect I was going for anyway LOL.
The materials I used were:
- Green, gold and white cardstock for the card and mats
- Chipboard for the Tim Holtz Tag & Labels Alterations die for the sentiment
- Hero Arts Clings "Antique Background" for the background of the card
- Derivan Matisse Matt Medium for stamping the butterflies and dragonfly
- Two of the butterflies from the "Butterflies" clear stamps by Stampendous
- Dragonfly stamp from the "Organic Grace" wood mounted set by Stampin' Up!
- Distress inks used on the background were Bundled Sage and Stormy Sky
- Glimmer Mists used on the sentiment were Patina and English Ivy
- Rhinestones by Basics
- Walnut Stain distress ink used to distress edges of card mat and labels die, and used the Tim Holts Distressing Tool to rough up the edges of the card mat
- Ribbon from my stash
- Adhesives were ATG tape, Scotch Quick Dry adhesive, Glossy Accents for ribbon and pop dots


