Hi everyone!
So today I was going to succeed at working with white over sprays without the sprays coming through. I failed miserably :(
Even though I sprayed 5 coats of hair spray (it's supposed to be a good fixative) the sprays still came through. I was so disappointed. Anyway I ended up finishing the page as best I could and I'm still bound and determined to find a way LOL.
I did go to my local art store today and bought some Liquitex clear gesso which I will try to add over the top of the multiple coats of fixative. I'm not giving up yet LOL.
Anyway you can see the full painful process on my live stream recording by CLICKING HERE.
Products used:
Liquitex Professional Gesso
Lindy's Stamp Gang 'witch's potion purple' starburst spray
Lindy's Stamp Gang 'jazzy jivin' purple' starburst spray
Lindy's Stamp Gang 'azure sea asters' starburst spray
Lindy's Stamp Gang 'tibetan poppy teal' starburst spray
s-e-i 'purple' tumble dye spray
Heidi Swapp 'hot pink' Color Shine
Dylusions 'bubblegum pink' ink spray
Dylusions 'funky fuchsia' ink spray
Dylusions 'vibrant turquoise' ink spray
Adirondack 'purple twilight' Color Wash
The Crafters Workshop 'cosmic bubbles' stencil
White POSCA paint pen
Black POSCA paint pen
Ecoline black brush pen
Portfolio 'blue violet' water soluble oil pastel
Isocol rubbing alcohol
Tim Holtz 'small talk' idea-ology stickers
Thanks so much for stopping by!
Smiles
Jen
My Other Pages
▼
Friday, June 29, 2018
Wednesday, June 27, 2018
Art Journal Page 203
Hi everyone!
Today's page is one that could have been created with a lot less layers. Most of the layers were lost! I really need to learn the art of restraint.
Today's page is one that could have been created with a lot less layers. Most of the layers were lost! I really need to learn the art of restraint.
You can watch the full (painful) process on YouTube by CLICKING HERE.
Products used:
Liquitex Professional Gesso
KaiserCraft 'script' stamp
Ranger 'jet black' archival ink
KaiserCraft 'flutter' stamp
Ranger 'manganese blue' archival ink
Inkadinkado 'dot flourishes' stamp set
Brilliance 'galaxy gold' archival pigment ink
Hero Arts 'sketch circle' stamp
Pebeo 'iridescent precious gold' acrylic paint
The Crafters Workshop 'organic matter' mask
The Crafters Workshop 'organic matter' stencil
Semco 'sky blue' acrylic paint
J.Burrows 'teal' acrylic paint
Reeves 'deep turquoise' acrylic paint
The Crafters Workshop 'moving vines' stencil
Winsor & Newton 'phthalo turquoise' acrylic paint
Gold gel pen
Reeves 'payne's gray' acrylic paint
Tim Holtz 'layered dragonfly' die & embossing folder
Dylusions 'white linen' ink spray
Lindy's Stamp Gang 'Azure Sea Asters spray
Jacquard 'old brass' Lumiere paint
Jacquard 'pearl turquoise' Lumiere paint
Jacquard 'pearl white' Lumiere paint
Aleene's Tacky Glue
Heidi Swapp 'gold' Color Shine
Tim Holtz 'small talk' idea-ology sticker
Thanks so much for stopping by!
Smiles
Jen
Monday, June 25, 2018
Stencil Storage Folder
Hi everyone!
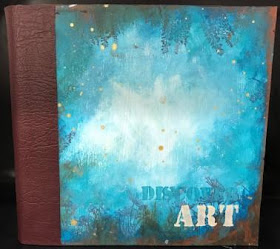
My 6"x6" stencil collection has grown exponentially of late and I had to do something about it. Not only because they've multiplied, but the A5 binder I had them in just wasn't working. As the folder sleeves were 6" wide and the stencils were 6" wide, the stencils were tearing the plastic sleeves every time I was trying to get them out or put them back in.
I had previously made a folder for my 6"x6" stencils but I used cardstock for the hinges (slotted into a 2 ring binder) which made it bulkier than I wanted. So this time I used Tyvek envelopes instead of the cardstock. The cardstock only fit 18 double pages and the coptic bound Tyvek hinges will fit 44 double pages!!! I could have made more but the 3 envelopes I cut up only made 44 and I wasn't about to cut up another just to add 6 more pages to get a 50 page binder LOL.
Anyway, I streamed live on YouTube painting the covers and you can watch the two parts by clicking the links below:
Stencil Folder Storage - Outside Covers
Stencil Folder Storage - Inside Covers
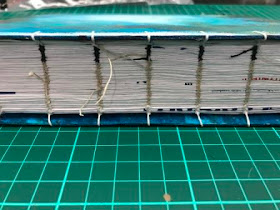
I then cut out all the Tyvek hinges, scored them, added double-sided tape and then bound them using the coptic binding method. I found a coptic binding tutorial on YouTube (there are plenty there) and used this one. You can check this binding method out by CLICKING HERE.
Once I bound the hinges I then cut all the plastic sleeves down to size then attached them to the hinges.
Finally I cut some vinyl down to size and adhered it to the front & back covers using liquid glue.
I did a quick video on how the folder came together and you can check it out by CLICKING HERE.
There are only a few tools & products required to make this storage folder and they are as follows:
Thanks so much for stopping by!
Smiles
Jen
My 6"x6" stencil collection has grown exponentially of late and I had to do something about it. Not only because they've multiplied, but the A5 binder I had them in just wasn't working. As the folder sleeves were 6" wide and the stencils were 6" wide, the stencils were tearing the plastic sleeves every time I was trying to get them out or put them back in.
I had previously made a folder for my 6"x6" stencils but I used cardstock for the hinges (slotted into a 2 ring binder) which made it bulkier than I wanted. So this time I used Tyvek envelopes instead of the cardstock. The cardstock only fit 18 double pages and the coptic bound Tyvek hinges will fit 44 double pages!!! I could have made more but the 3 envelopes I cut up only made 44 and I wasn't about to cut up another just to add 6 more pages to get a 50 page binder LOL.
Anyway, I streamed live on YouTube painting the covers and you can watch the two parts by clicking the links below:
Stencil Folder Storage - Outside Covers
Stencil Folder Storage - Inside Covers
I then cut out all the Tyvek hinges, scored them, added double-sided tape and then bound them using the coptic binding method. I found a coptic binding tutorial on YouTube (there are plenty there) and used this one. You can check this binding method out by CLICKING HERE.
Once I bound the hinges I then cut all the plastic sleeves down to size then attached them to the hinges.
Finally I cut some vinyl down to size and adhered it to the front & back covers using liquid glue.
I did a quick video on how the folder came together and you can check it out by CLICKING HERE.
There are only a few tools & products required to make this storage folder and they are as follows:
- 2 pieces of chipboard cut to 8 1/4" (wide) x 8" (tall)
- 44 strips of Tyvek cut to 2" (wide) by 8" (tall) scored in half at 1"
1 Large Tyvek envelope (15 1/2" x 12") cuts 21 strips at 7 1/2" x 2"
1 Medium Tyvek envelope (9" x 12") cuts 10 strips at 7 1/2" x 2" - 1 strip of cardstock for binding template
Pierce holes for hinges at 3/4",1 3/4", 2 3/4", 3 3/4", 4 3/4", 5 3/4", 6 3/4"
Pierce holes for covers (3/8" in from edge) at 1", 2", 3", 4", 5", 6", 7" - 44 plastic sleeves cut down to 7 1/2" x 7 1/2"
- 2 rolls Scor-tape (I used probably 1 full roll and probably a quarter of a second roll)
- a piece of vinyl (or preferred spine material) cut to 4 1/2" (wide) x 8" (tall)
- A few yards of waxed linen thread (or dental floss) for the coptic binding
- 44 sheets of cardstock (for inside plastic sleeves) cut to 7 1/4" x 7 1/4"
Thanks so much for stopping by!
Smiles
Jen
Wednesday, June 20, 2018
Late Night Stream - Stencil Folder Storage Covers - Inside
Hi everyone!
My stencil storage is expanding exponentially and I really need to do something about it. Firstly, the A5 folders that I currently use for my 6"x6" (and smaller) stencils is not working. The stencils are the same size as the width of the plastic sleeves and so they're all tearing while I'm trying to insert them or remove them.
I have already made another folder for my 6"x6" stencils and it's working great, however as I used cardstock for the hinges I'm finding that I cannot put as many stencils in as I would like. So I have decided up update it.
I am using Tyvek envelopes to use as the hinges because it's a lot thinner and stronger! So more durable and more stencils!!!!
Anyway, that's later on. Tonight I live streamed painting the inside chipboard covers of the folder. I have previously streamed painting the outside covers and you can watch that recording by CLICKING HERE.
I am currently working on cutting all the materials required for the pages, as well as documenting dimensions and quantities, so expect a supply list soon!
You can watch the full process video on painting the inside covers on my YouTube channel by CLICKING HERE.
Products used:
Liquitex Professional gesso
Jo Sonja's 'aqua' flow acrylic paint
Reeves 'sand' acrylic paint
J.Burrows 'teal' acrylic paint
Reeves 'deep turquoise' acrylic paint
Derivan 'phthalo green' acrylic paint
Winsor & Newton 'phthalo turquoise' acrylic paint
Reeves 'paynes gray' acrylic paint
Liquitex Basics 'titanium white' acrylic paint
Pebeo 'iridescent precious gold' acrylic paint
Liquitex Basics 'copper' acrylic paint
The Crafters Workshop 'reversed chicken wire' stencil
The Crafters Workshop 'mini cone flowers' stencil
The Crafters Workshop 'moving vines' stencil
The Crafters Workshop 'mini numerals' stencil
The Crafters Workshop 'mini art is' stencil
KaiserCraft 'birch' template
Dylusions 'diamond border' stencil
The Crafters Workshop 'mini organic matter' mask
The Crafters Workshop 'mini organic matter' stencil
Heidi Swapp 'gold' Color Shine
Thanks so much for stopping by! Come back soon if you want the dimensions for the folder :)
Smiles
Jen
Friday, June 15, 2018
Art Journal Page 202
Hi everyone!
Today's art journal page is based on the tag #8 - background reveal technique (see previous post HERE).
Even though I had issues with the masking fluid today I was much happier with the result of the journal page than I was with the tag LOL.
This is what the page looked like with all that paint sponged on it:
I'm not having much luck with this new craft room! I keep losing things (still looking for the ring cluster stencil) and can't find where I've actually stored tools and products yet *sigh*. Oh well, the more I play the more I'll get used to it, I guess :)
You can watch the full process video on my YouTube channel by CLICKING HERE.
Products used:
Liquitex Professional gesso
Global Colours 'cool yellow' acrylic paint
Global Colours 'orange' acrylic paint
Global Colours 'cobalt hue' acrylic paint
Reeves 'rose madder' acrylic paint
J.Burrows 'teal' acrylic paint
The Crafters Workshop 'cosmic bubbles' stencil
SimonSaysStamp 'ring cluster' stencil
Various sized Stampin' Up! circle punches
Dylusions 'diamonds - small' stencil
CreativePL 'mars black' acrylic paint
Black uni POSCA 0.6mm pen
Black Faber-Castell PITT Artist brush pen
Thanks so much for stopping by and stay tuned for more!
Smiles
Jen


